Setting up our Alexa Skill
The first thing we need to do is set up our interaction model. First, we are going to create the {% c-line %}OrderIntent{% c-line-end %}. For this example, this intent will have only one utterance and one slot. This slot will have the {% c-line %}AMAZON.SearchQuery{% c-line-end %} type:
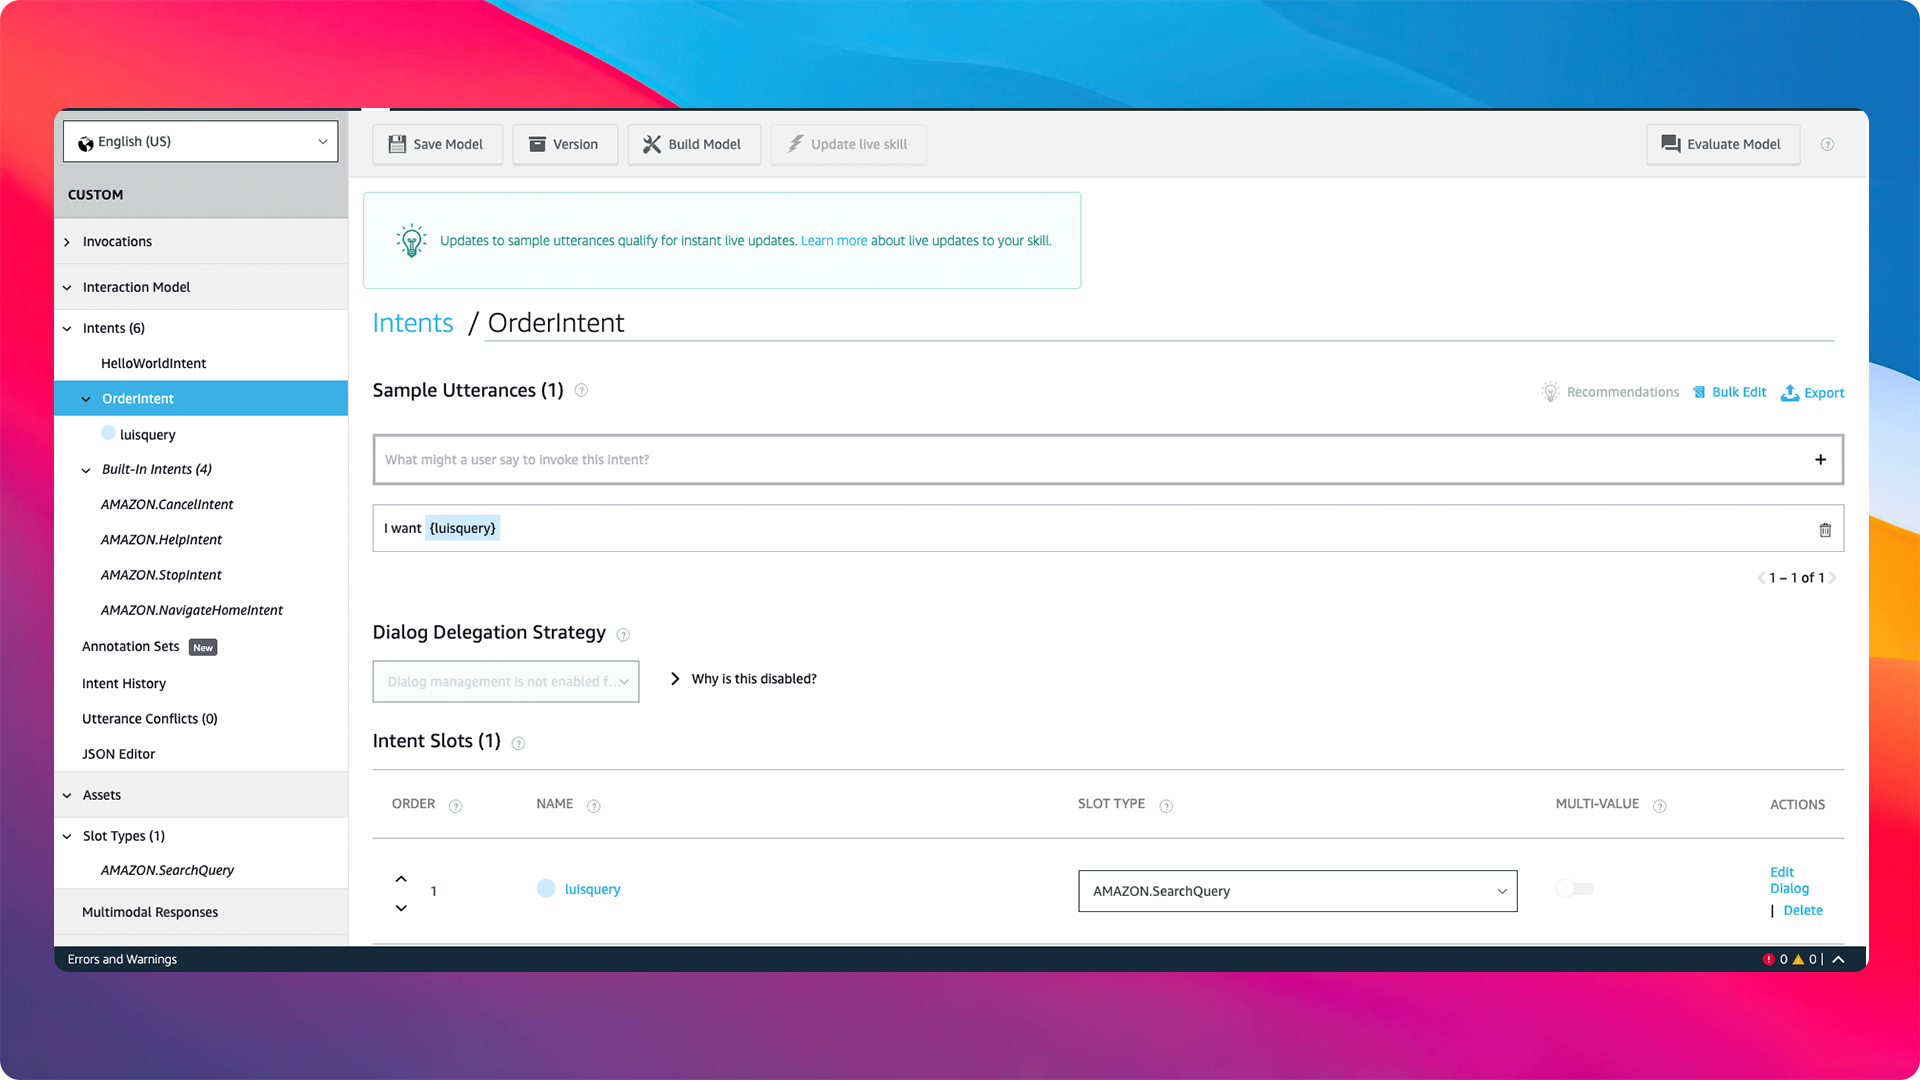
By definition, a {% c-line %}AMAZON.SearchQuery{% c-line-end %} slot is a bit different from the rest. It functions like a standard search engine, and with it we will be able to recognize less-predictable inputs. To use this slot, you will need to add a carrier phrase to your utterances. In this example, I used {% c-line %}I want{% c-line-end %}. Essentially, what we are sending to MS LUIS is everything that Alexa recognizes after we say {% c-line %}I want...{% c-line-end %}.
Creating Azure Cognitive Services
We need to create some Azure resources in order to interact with a Microsoft LUIS App from an Amazon Alexa Skill.
First, we need to create a Natural Language Understanding Service within Cognitive Services on the Azure Portal:
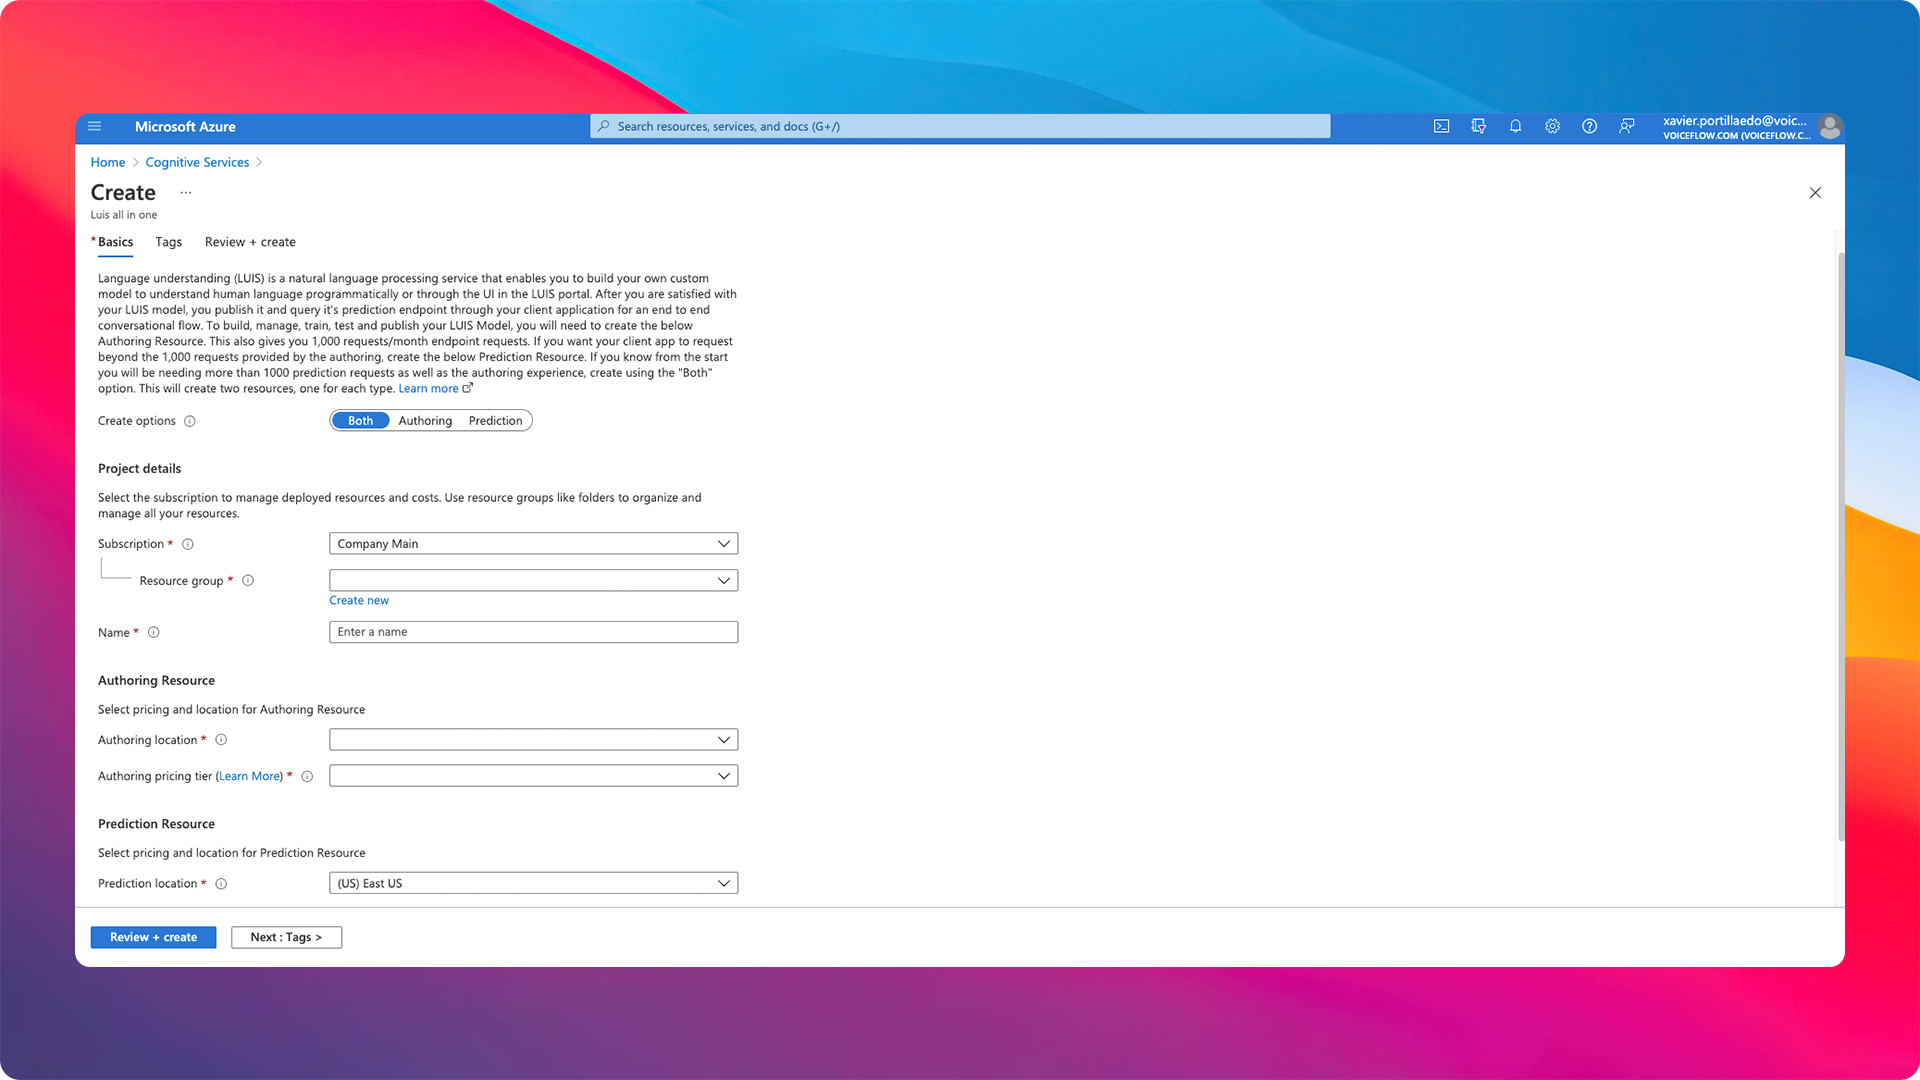
NOTE: make sure that you have checked the prediction and authoring services during the creation process.
After this, ensure you have copied the endpoint. We are going to use this endpoint to interact with MS LUIS. You can find the endpoint after the creation within the Keys and Endpoint section, exemplified below.
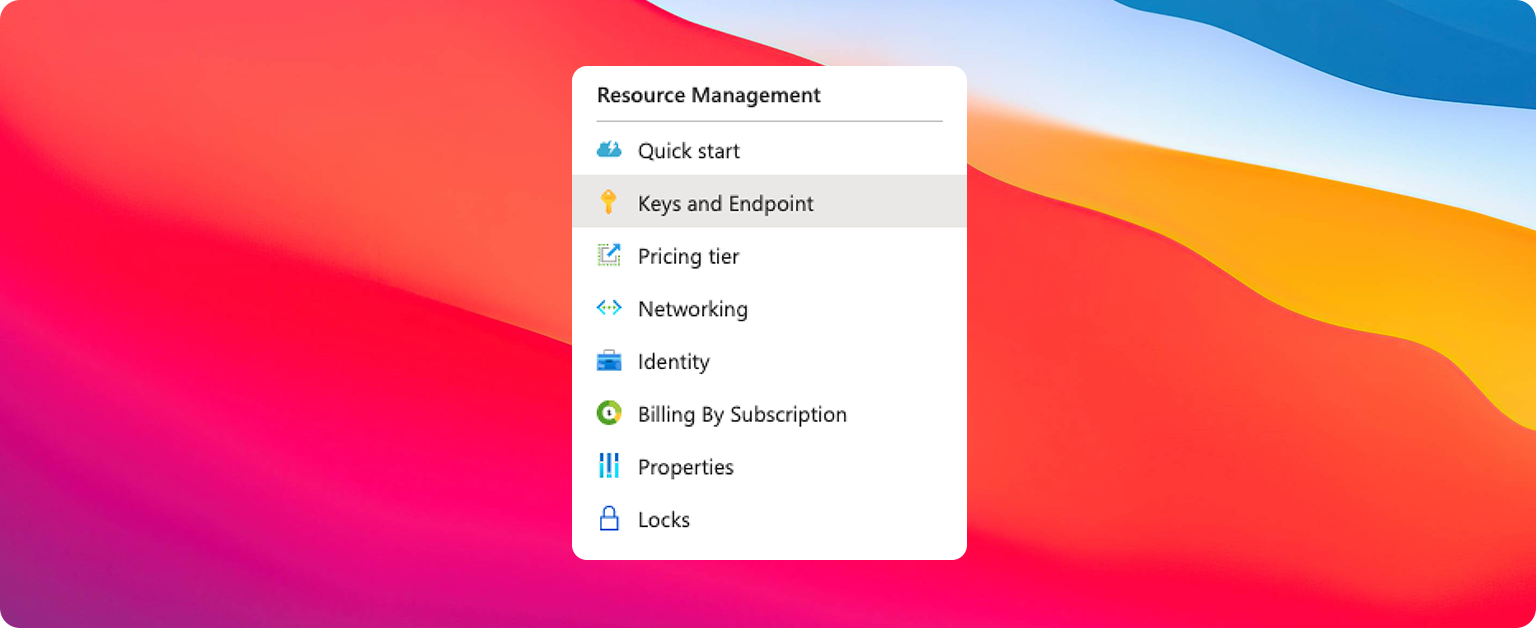
It's important to make sure you have copied the {% c-line %}region{% c-line-end %} and the {% c-line %}Key 1{% c-line-end %}. This is the subscription we are going to use in next steps.
Creating MS LUIS App
Once you have created your Azure resources, you can create your MS Luis App on the Luis Portal:
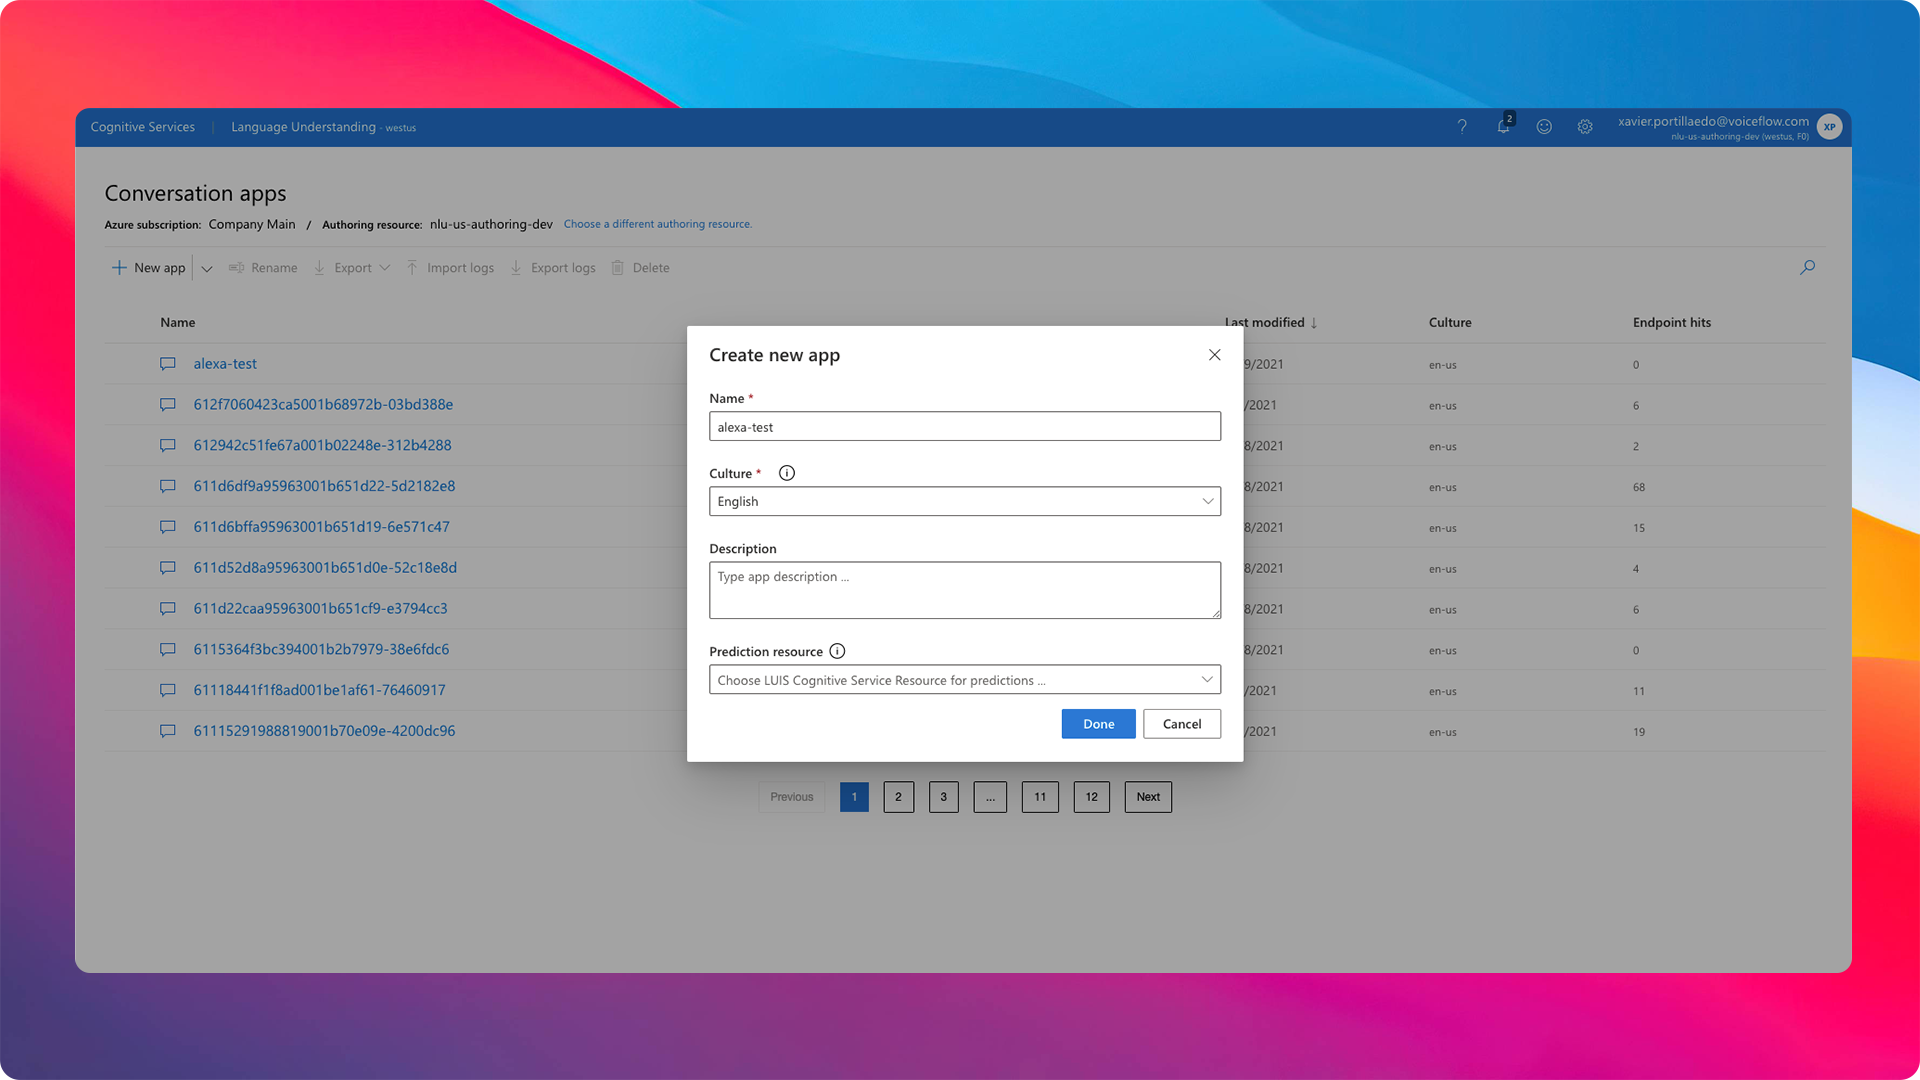
NOTE: make sure that you use the prediction endpoint you created in the previous step.
Now that we have our MS LUIS app, let's add to the interaction model:
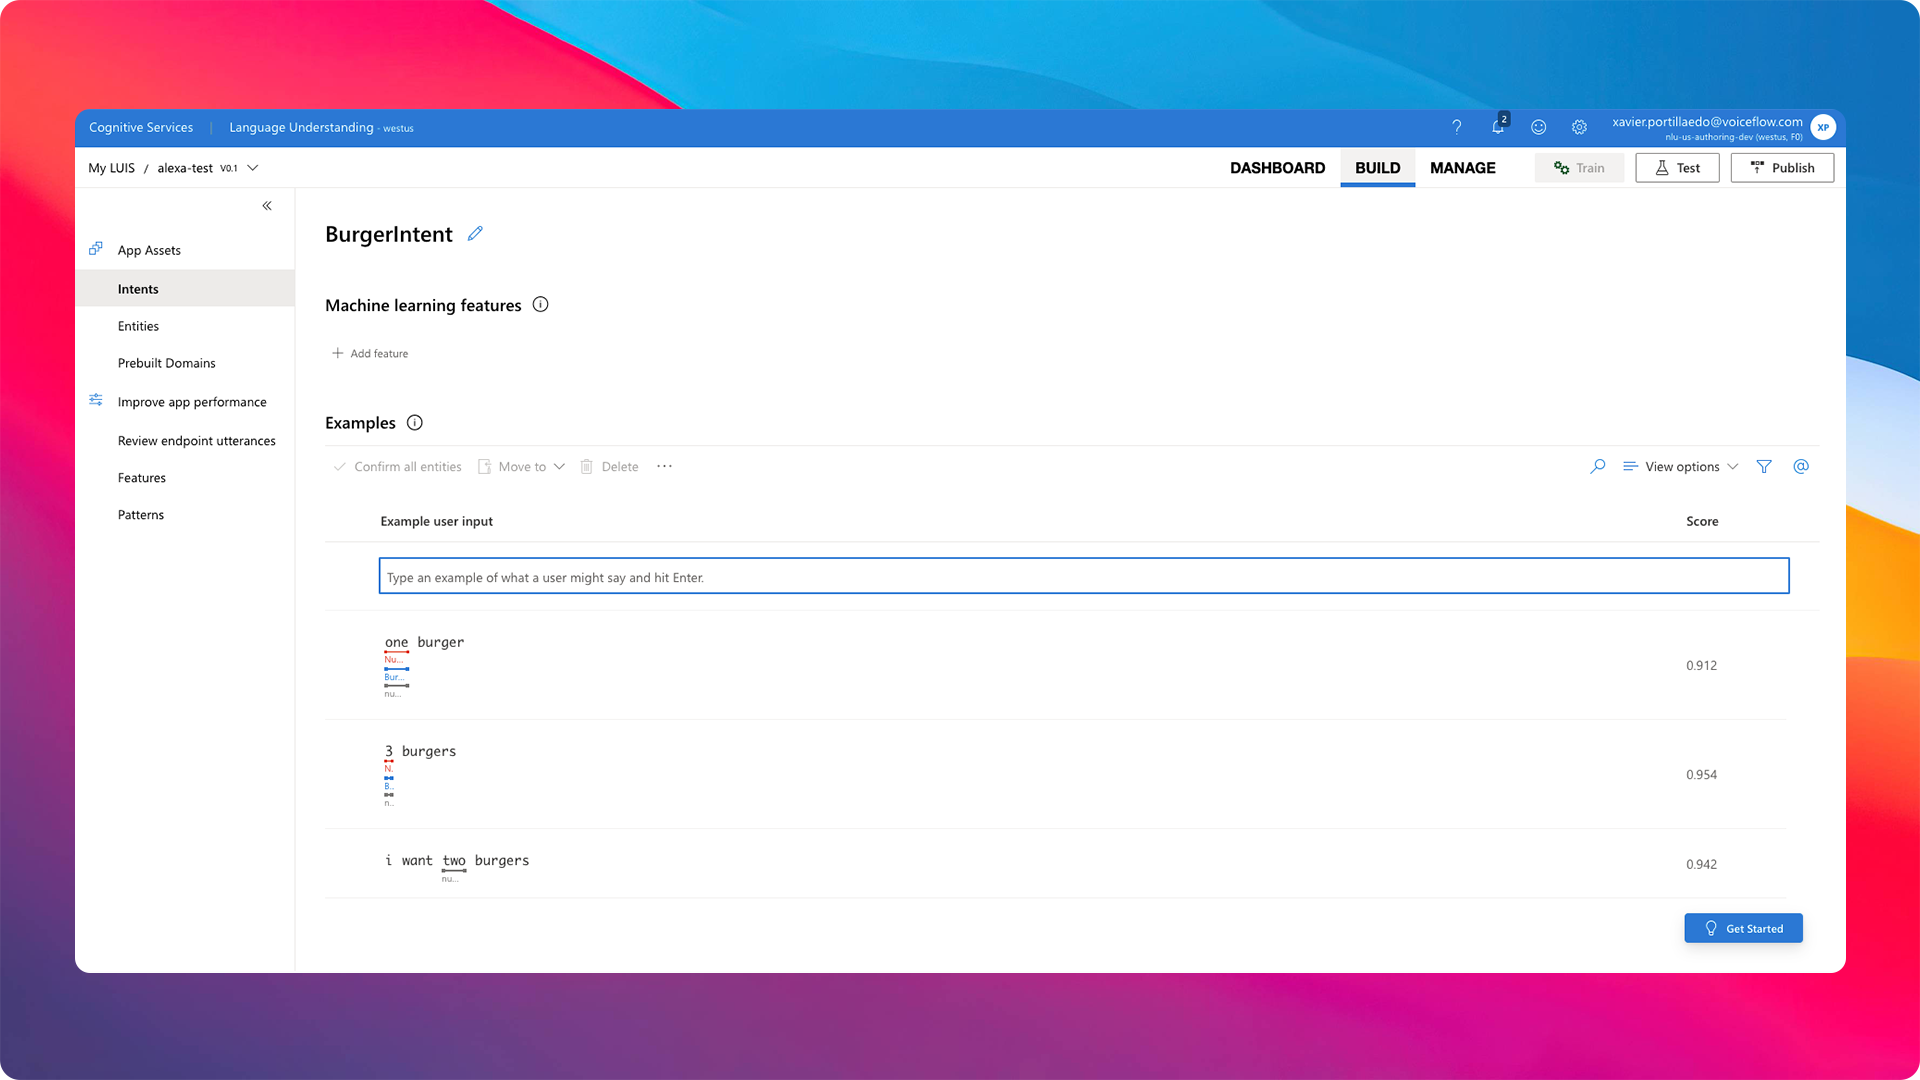
When you have built your entities and intents, you can train your model and finally publish your LUIS app to {% c-line %}Staging{% c-line-end %}.
Calling MS LUIS from Alexa Skill
Now that we have everything set up let's write our code! To interact with MS LUIS from the Alexa Skill Lambda written Node.JS, we are going to use the npm package called {% c-line %}@azure/cognitiveservices-luis-runtime{% c-line-end %}. You can find the full documentation of the package here.
First, we have to create our {% c-line %}OrderIntentHandler{% c-line-end %} which is the handler that is going to manage all the requests from the {% c-line %}OrderIntent{% c-line-end %}:
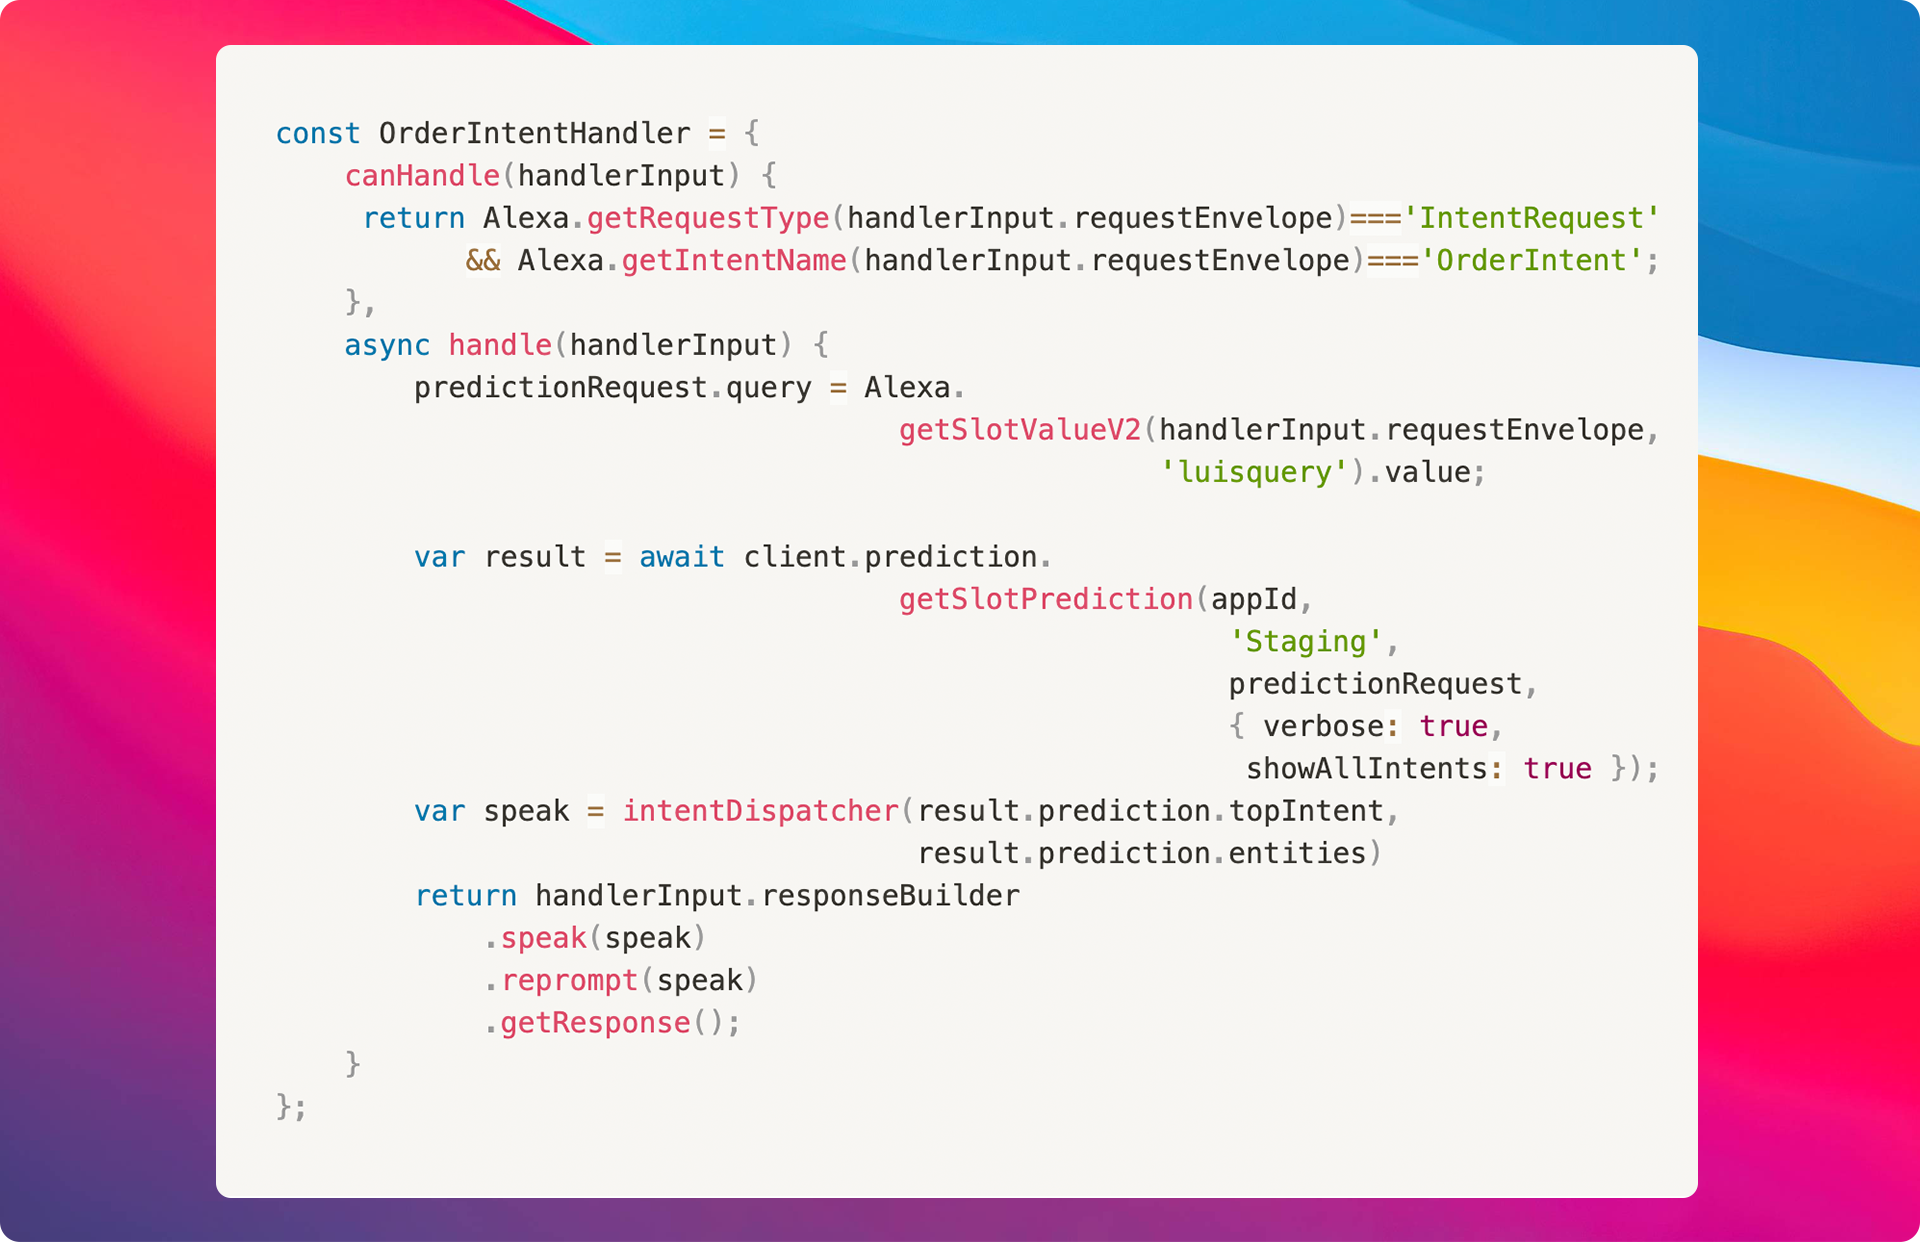
As you can see in the code above, we are getting the value from our {% c-line %}AMAZON.SearchQuery{% c-line-end %} slot called {% c-line %}luisquery{% c-line-end %} and then, we are sending that value to MS LUIS using the {% c-line %}client{% c-line-end %} and the function {% c-line %}getSlotPrediction{% c-line-end %}.
To build the client, we need three properties:
- MS LUIS app id - You can find this value in you LUIS APP on the LUIS Portal.
- MS Subscription id - This MS Subscription id is the one that we have get on the previous step.
- MS LUIS Prediction endpoint - This endpoint is the one that we have get on the previous step.
With these properties, we can create our MS LUIS Client as follows:

The result that we are going to receive from MS LUIS will be managed by the {% c-line %}intentDispatcher{% c-line-end %}:

Final Result
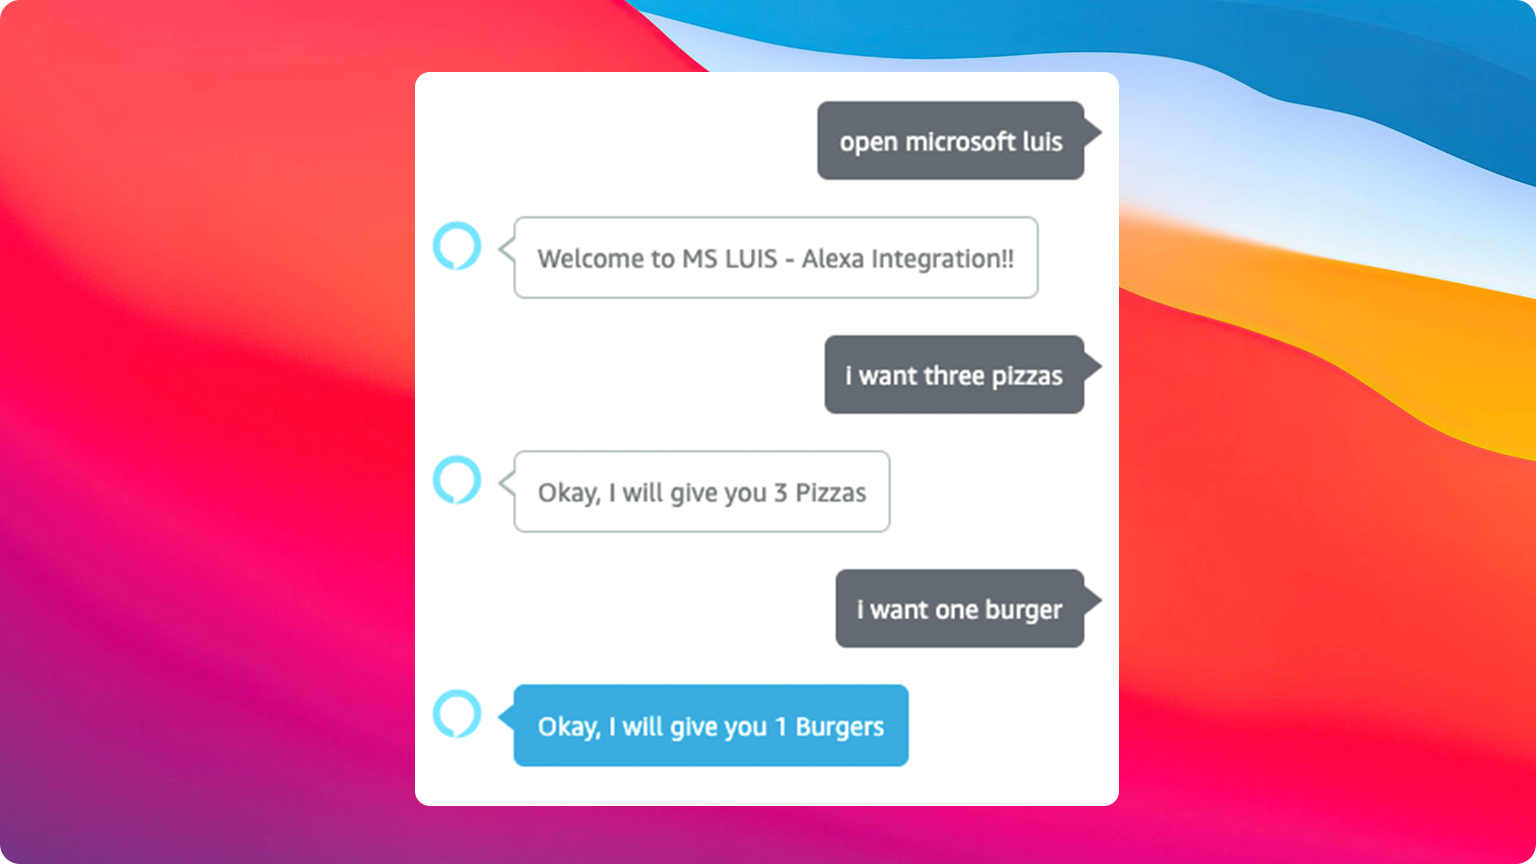
And that's it! Now you have the full code running with Alexa using Microsoft LUIS as its NLP engine:
Resources:
1. Official Alexa Skills Kit Node.js SDK
2. Official Alexa Skills Kit Documentation
3. Official Express Adapter Documentation
4. Official Microsoft Azure SDK Documentation
Conclusion
You can see how easy it is to integrate other NLP engines into our Alexa Skills. While this is an experiment, you may wish to stick with Alexa's built-in natural language processing, since you can get unpredictable results using the AMAZON.SearchQuery.
I really hope this example project is useful in helping you integrate external NLPs with your Alexa Skills. Happy coding!
Setting up our Alexa Skill
The first thing we need to do is set up our interaction model. First, we are going to create the {% c-line %}OrderIntent{% c-line-end %}. For this example, this intent will have only one utterance and one slot. This slot will have the {% c-line %}AMAZON.SearchQuery{% c-line-end %} type:

By definition, a {% c-line %}AMAZON.SearchQuery{% c-line-end %} slot is a bit different from the rest. It functions like a standard search engine, and with it we will be able to recognize less-predictable inputs. To use this slot, you will need to add a carrier phrase to your utterances. In this example, I used {% c-line %}I want{% c-line-end %}. Essentially, what we are sending to MS LUIS is everything that Alexa recognizes after we say {% c-line %}I want...{% c-line-end %}.
Creating Azure Cognitive Services
We need to create some Azure resources in order to interact with a Microsoft LUIS App from an Amazon Alexa Skill.
First, we need to create a Natural Language Understanding Service within Cognitive Services on the Azure Portal:

NOTE: make sure that you have checked the prediction and authoring services during the creation process.
After this, ensure you have copied the endpoint. We are going to use this endpoint to interact with MS LUIS. You can find the endpoint after the creation within the Keys and Endpoint section, exemplified below.

It's important to make sure you have copied the {% c-line %}region{% c-line-end %} and the {% c-line %}Key 1{% c-line-end %}. This is the subscription we are going to use in next steps.
Creating MS LUIS App
Once you have created your Azure resources, you can create your MS Luis App on the Luis Portal:

NOTE: make sure that you use the prediction endpoint you created in the previous step.
Now that we have our MS LUIS app, let's add to the interaction model:

When you have built your entities and intents, you can train your model and finally publish your LUIS app to {% c-line %}Staging{% c-line-end %}.
Calling MS LUIS from Alexa Skill
Now that we have everything set up let's write our code! To interact with MS LUIS from the Alexa Skill Lambda written Node.JS, we are going to use the npm package called {% c-line %}@azure/cognitiveservices-luis-runtime{% c-line-end %}. You can find the full documentation of the package here.
First, we have to create our {% c-line %}OrderIntentHandler{% c-line-end %} which is the handler that is going to manage all the requests from the {% c-line %}OrderIntent{% c-line-end %}:

As you can see in the code above, we are getting the value from our {% c-line %}AMAZON.SearchQuery{% c-line-end %} slot called {% c-line %}luisquery{% c-line-end %} and then, we are sending that value to MS LUIS using the {% c-line %}client{% c-line-end %} and the function {% c-line %}getSlotPrediction{% c-line-end %}.
To build the client, we need three properties:
- MS LUIS app id - You can find this value in you LUIS APP on the LUIS Portal.
- MS Subscription id - This MS Subscription id is the one that we have get on the previous step.
- MS LUIS Prediction endpoint - This endpoint is the one that we have get on the previous step.
With these properties, we can create our MS LUIS Client as follows:

The result that we are going to receive from MS LUIS will be managed by the {% c-line %}intentDispatcher{% c-line-end %}:

Final Result
And that's it! Now you have the full code running with Alexa using Microsoft LUIS as its NLP engine:

Resources:
1. Official Alexa Skills Kit Node.js SDK
2. Official Alexa Skills Kit Documentation
3. Official Express Adapter Documentation
4. Official Microsoft Azure SDK Documentation
Conclusion
You can see how easy it is to integrate other NLP engines into our Alexa Skills. While this is an experiment, you may wish to stick with Alexa's built-in natural language processing, since you can get unpredictable results using the AMAZON.SearchQuery.
I really hope this example project is useful in helping you integrate external NLPs with your Alexa Skills. Happy coding!


.svg)